|
|
Making a scene with Vue d' Esprit 2 allowing you to see above and below water.
This tutoriel explains step by step how to make a scene where the camera is
positionned in such a way that you can see above and below water, as if you
were a diver or on edge of a mini submarine.
|
Level:
|
easy.
|
|
Necessary knowledge:
|
boolean operations with Vue d' Esprit 2.
adding caustics
to water.
|
First stage
Start a new scene with " Clear Spring " atmosphere, for instance.
Select the camera and enter 270° as value of rotation on Z axis, so it will be
much easier to position the various elements.
Create a water plane and for more realism, give him "caustics".
You can also download the example texture  .
.
Move it at an altitude of 100. Do not forget that if you want to see what
occurs under water, you must place the water level under the ground in the
" World browser ".
Such a plane being infinite, it is necessary to create a " bubble of air there
" to be able to put the camera in (a little like the divers which need a mask
to see clearly under water).
For that create a cube (a cylinder or a sphere is also appropriate, but the
square faces of the cube will be useful to us thereafter) and give him a
transparent texture. The default cube with a dimension of 30 is perfectly
appropriate.
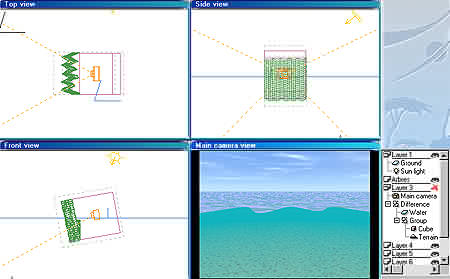
It should now be positioned in such a way that the water level cuts it to
middle height (z=100). Made a Boolean difference between the water level and
the cube. You, like Moďse, has just created a passage in the sea.
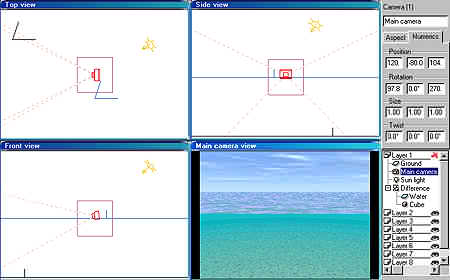
Place there the camera, its altitude having to exceed slightly the level of
water (if water is at z=100, put the camera at z=104, for example). Then
incline it so that it looks at in-depth.
Ouf, the first part is finished, back up the scene if you have not do it yet,
and launch a first
render to see whether you did not forget anything.
Second stage
All this is quite pretty, but a rectilign sea with waves is not very realistic.
We now will simulate an effect of waves in front of the camera.
Be warned: rendering times are considerably increased with this effect.
The trick consists in placing a transparent terrain with wavy shape in front of
the cube containing the camera (this is why we have chosen a cube, remember).
Therefore create a 100x100 terrain, go in the terrain editor, click on
" Reset " and draw vertical lines (the drawing tool must be round), then
apply several times a diffuse erosion. 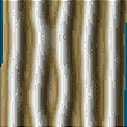
Good, give this terrain a transparent texture, redimensionne rotationne and
relocates it so that it is posed in front of the cube containing the camera.
Solidarize the cube and the ground in a group.
Back up before launching render (that should be a reflex)...
Argh! spots everywhere. Yes, the ground is not eroded enough; it is necessary
to fill the gaps. Redo several diffuse erosions until you get rid of it. This
is long and tedious job, so you can if you want, download a ready-made terrain.
You will then notice that the waves have funny orientation. To give them a
little more natural aspect, lean the group [ cube + terrain ] so that it is
parallel with the camera.
Right, the effect is there, you just have now to start your scene ;-) .
For all those who have not understand anything (or which would have
misused the Bottle too much ;o) ), I made a
simplified scene you can download. An example
of use of this effect is in the gallery .
 Simplified scene (74.2 Ko).
Do not hesitate to
mail me
for comments.
|